Files that you delete on Windows 11 PCs are deleted without a delete confirmation prompt. The default configuration sends the selection of files to the Recycle Bin. Users may restore accidentally deleted files from the Recycle Bin, unless it is has been emptied already manually or automatically.
Windows 11 comes with options to enable delete confirmation dialogs. These are displayed whenever files or folders get deleted by the user, e.g. by right-clicking on files in File Explorer and selecting the delete option, or by using the Delete-key on the keyboard while files or folders are selected.
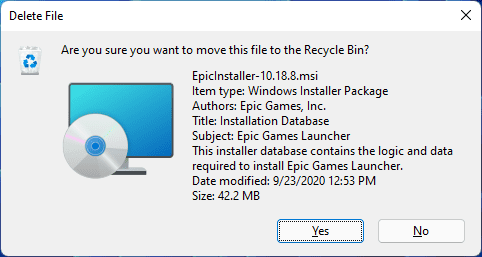
Some users may prefer these confirmation dialogs to avoid deleting files or folders accidentally. It is a second safeguard that can be enabled, with the Recycle Bin being the first.
Tip: some users prefer to disable the Recycle Bin completely, or use the Shift-Delete shortcut to bypass it manually.
Enable Delete Confirmations on Windows 11 using the Recycle Bin
The process of enabling confirmation prompts when files get deleted is identical to the process on previous versions of Windows, including Windows 10.
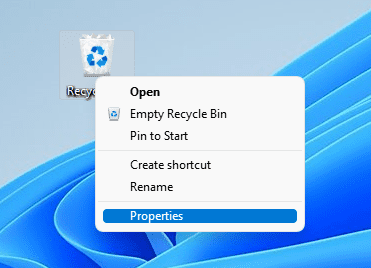
Step 1: Right-click on the Recycle Bin icon that is displayed on the desktop by default and select the Properties context menu option.
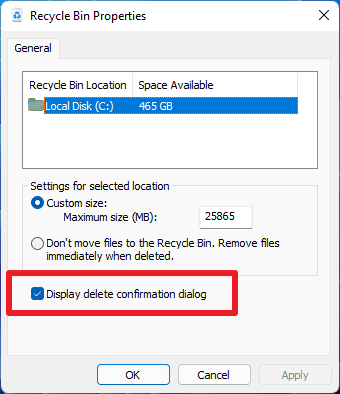
Step 2: The Recycle Bin Properties window displays all Recycle Bin locations and the available space on each. Locate and check the "Display delete confirmation dialog" option at the bottom of the window. Select Apply and then OK to complete the process. Note that the setting is a global setting, meaning that prompts will be displayed for all delete actions on all connected drives from that moment on.
Step 3: Test the new functionality. Just open File Explorer and delete a file, e.g. by right-clicking on it and selecting the Delete icon or by using the Delete-key on the keyboard.
You may undo the change at any time by removing the checkmark from the preference again in the Recycle Bin properties.
Enable Delete Prompts on Windows 11 using the Group Policy Editor
The Group Policy Editor is only available on professional and Enterprise versions of Windows 11. Here is how you enable delete confirmation dialogs on systems for users.
Here is the description of the policy:
Allows you to have File Explorer display a confirmation dialog whenever a file is deleted or moved to the Recycle Bin.
If you enable this setting, a confirmation dialog is displayed when a file is deleted or moved to the Recycle Bin by the user.
If you disable or do not configure this setting, the default behavior of not displaying a confirmation dialog occurs.
Step 1: Open Start, type gpedit.msc and select open from the menu; this loads the Group Policy Editor on the system.
Step:2 Use the left sidebar tree to navigate to User Configuration > Administrative Templates > Windows Components > File Explorer.
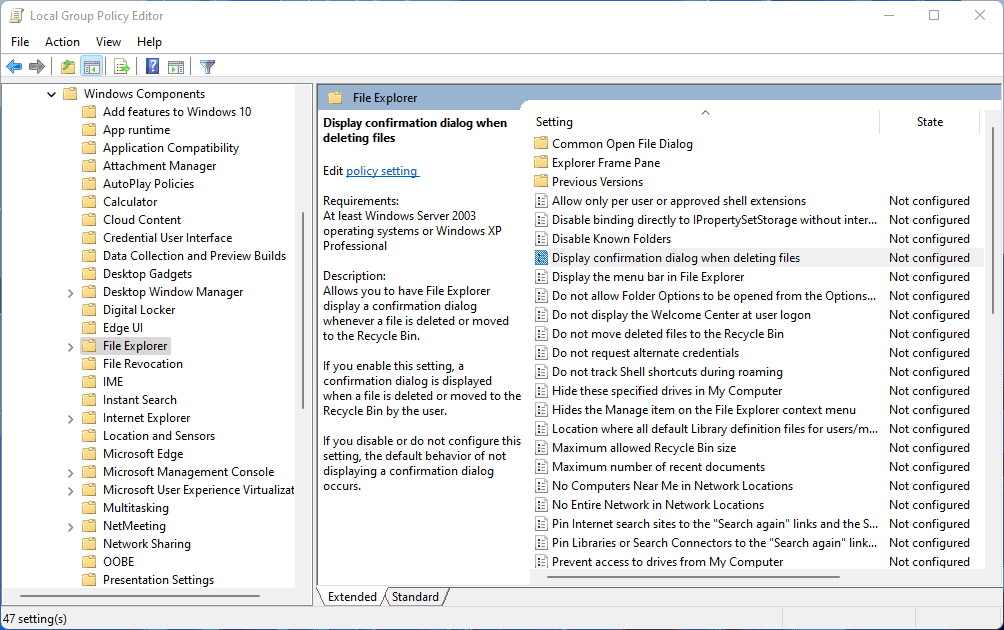
Step 3: Double-click on the policy "Display confirmation dialog when deleting files".
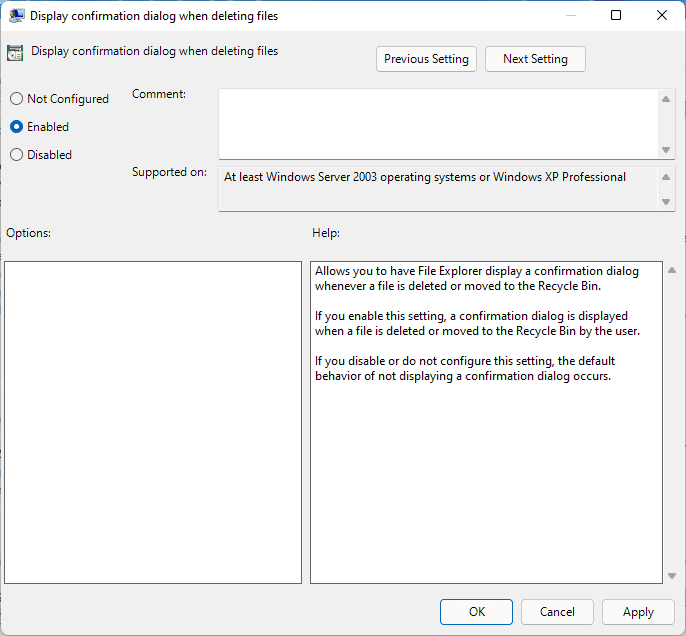
Step 4. Set the state of the policy to Enabled. Select Apply and the OK to complete the process and close the policy window again.
The PC needs to be restarted before the change takes effect.
You may undo the change at any time by setting the policy to Disabled or Default.
Turn on delete prompts on Windows 11 using the Registry
If the Recycle Bin icon is not displayed on the desktop or if you prefer using the Registry or need to use it, e.g. on Home editions of the Windows 11 operating system.
Step 1: Select Start, type regedit.msc, and select the open options from the menu. Windows displays an UAC prompt that you need to accept. The Registry Editor is started afterwards.
Step 2: Paste the following path into the address field at the top: Computer\HKEY_CURRENT_USER\SOFTWARE\Microsoft\Windows\CurrentVersion\Policies\Explorer
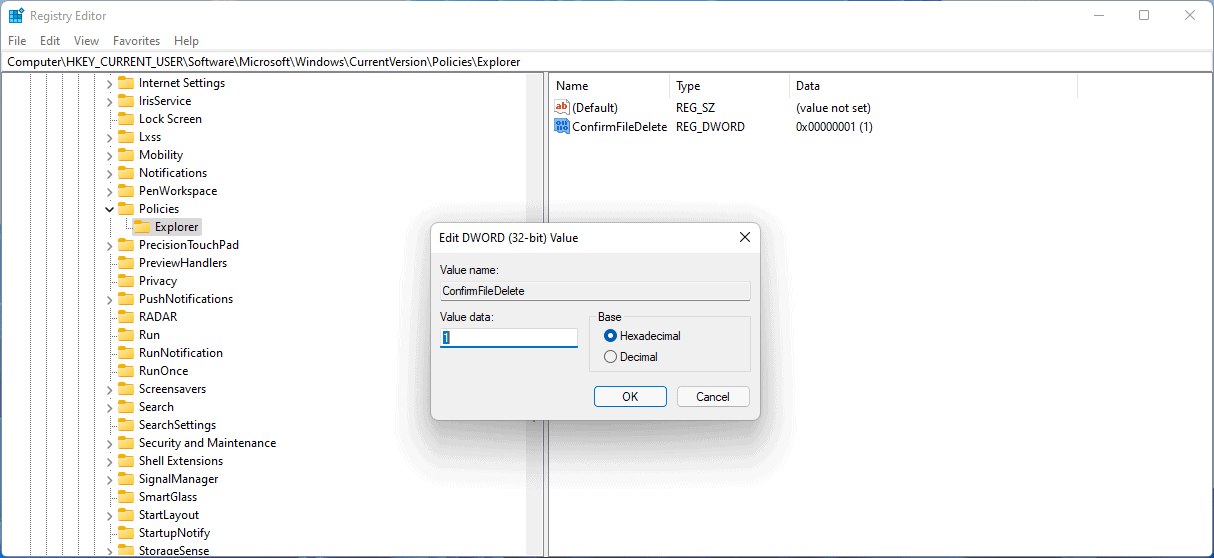
Step 3: Right-click on Explorer and select New > Dword (32-bit) Value from the context menu.
Step 4: Name the new Dword ConfirmFileDelete.
Step 5. Double-click on the new Dword and set its value to 1. A value of 1 means that file deletion prompts are displayed.
A restart is required before the change takes effect.
You may undo the change at any time by deleting the Dword Value in the Registry.
Now You: how do you handle this on your machines?
Thank you for being a Ghacks reader. The post How to enable file delete confirmations on Windows 11 appeared first on gHacks Technology News.


0 Commentaires