A drop-down list is an interactive list of options that allows the user to choose one value from a list. This guide will walk through how to add a drop-down list to any Microsoft Word template and make different options for the list.
What Does a Drop-down List in Word Do?
A drop-down list is used in many different applications, including Microsoft Word. It's a way to display a list of options in a text box so the user can select one option.
Drop-down lists are used for a variety of reasons. For example, they help display lists of items where each has its title and description. Another reason for their use is when many options must be displayed in a single text box.
Drop-down lists allow users to enter their selection by clicking on the one they wish to choose from the list. When creating drop-down lists, it's important to consider how many options you want your users to have access to.
How To Add a Drop-down List in Microsoft Word?
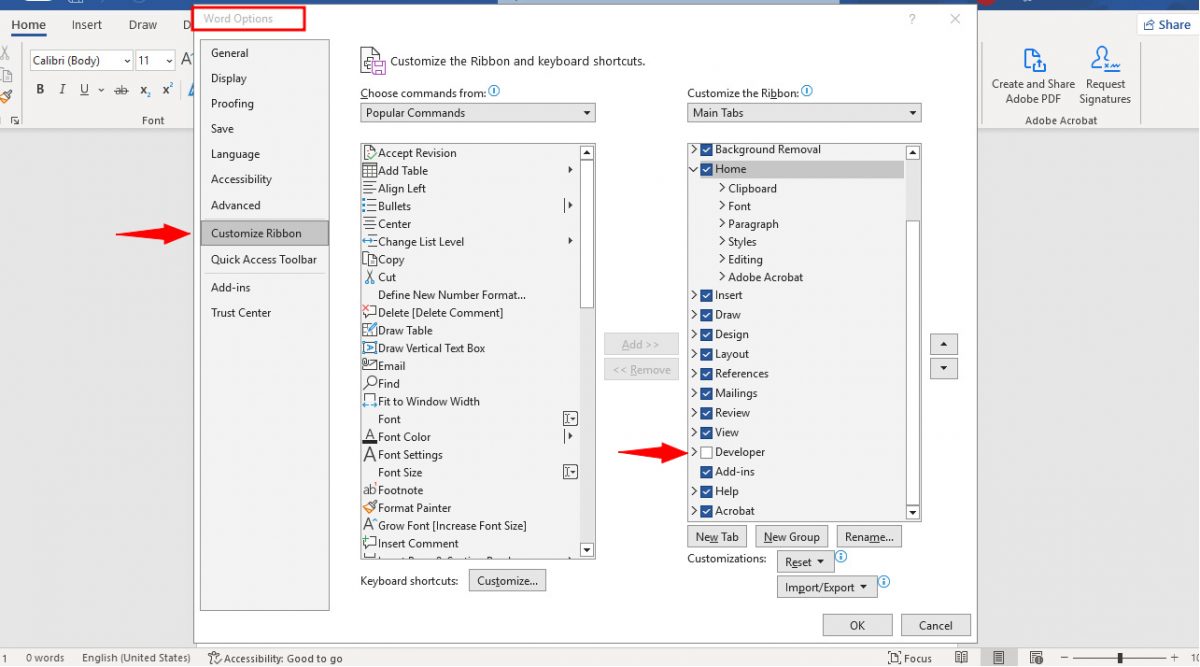
Before adding a drop-down list, you must first enable the developer menu. This is because the list is hidden and will be seen only after activating the menu.
To enable the developer menu, you must click on open and then click on options at the bottom left of the menu. Under options, you must then click on the customize ribbon option. The entire menu will open on the right. You will see a developer option with a check box next to it. Activate it by enabling the check box. You can now prepare drop-down lists.
Open a word document and place the cursor where you want the list to appear. Type the question and press enter. You must then select developer from the menu option.
Under the developer menu, check out the controls section. Over there, click on the icon for "Drop-Down List Content Control." This icon looks like a drop-down list.
A drop-down list will now appear under the question (where your cursor was placed). Since the drop-down list is empty, you must configure it by selecting properties under the controls section. A pop-up will appear where you can enter a title for the list. This title will appear when no option is selected from the drop-down.
You can edit the color theme and also select from various other options. For example, if you don't want anyone tampering with the drop-down, you can activate the option that states content control cannot be deleted. You should, however, lock your document because anyone can enter properties and disable the option.
Once you've selected properties, you can add them to your drop-down list. You can do so by clicking add on the right of the pop-up. Enter the display name field, and the value will auto-populate. Click ok and repeat this process until all fields have been entered.
You can even move fields up and down, depending on your preference. Once you click ok, your changes will be saved, and your drop-down list will be ready.
Time To Populate Your Data
Although adding a drop-down list in Word may seem complicated initially, it is straightforward. This tutorial allows you to add drop-down lists to multiple documents in a matter of minutes. It gives you a chance to become a master of this Office tool.
Thank you for being a Ghacks reader. The post How to Add a Drop-Down List to a Word Document appeared first on gHacks Technology News.


0 Commentaires